How to migrate Shopify customers and orders to WooCommerce?
In this guide, you will learn how to successfully migrate Shopify customers and orders to WooCommerce without changing the customer’s email or order data.
Whether you need to move a few or thousands of Shopify customers and orders between sites, you are in good hands!
Remember to stay patient, take backups after each step, and practice on different staging sites if need be.
What is the process to migrate WooCommerce customers and orders from site to site?
- Export Customers from Shopify
- Import Customers to WooCommerce
- Export Orders from Shopify
- Import Orders to WooCommerce
Make sure to migrate your customers before migrating your orders. How come? Each order is mapped to a single customer. If the customer has not been migrated yet, the order cannot map to that customer. This is especially important if you are merging customers and orders between sites and you want your customers to keep their same password.
Further, make sure to migrate your products before migrating your customers or orders. How come? Each order is mapped to a single product id/sku, and without a product id/sku, you will not be able to tell what products the customer order and thus, WooCommerce will not allow you to import the order.
What plugins will we need?
Yes, I know that this is a paid plugin, but will save a lot of time and headaches in the migration process and ensure that your customers and orders are moved correctly.
If you are more of a visual learner, check out the video tutorial below:
Let’s begin!
1. Export Customers from Shopify
Step 1
First, go to Shopify site and log into the back-end.
Step 2
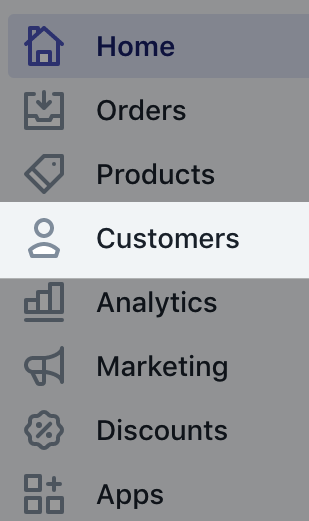
Next, on your Shopify dashboard, click “Customers” and when you get to “Customer” page, click “Export”.

Step 3
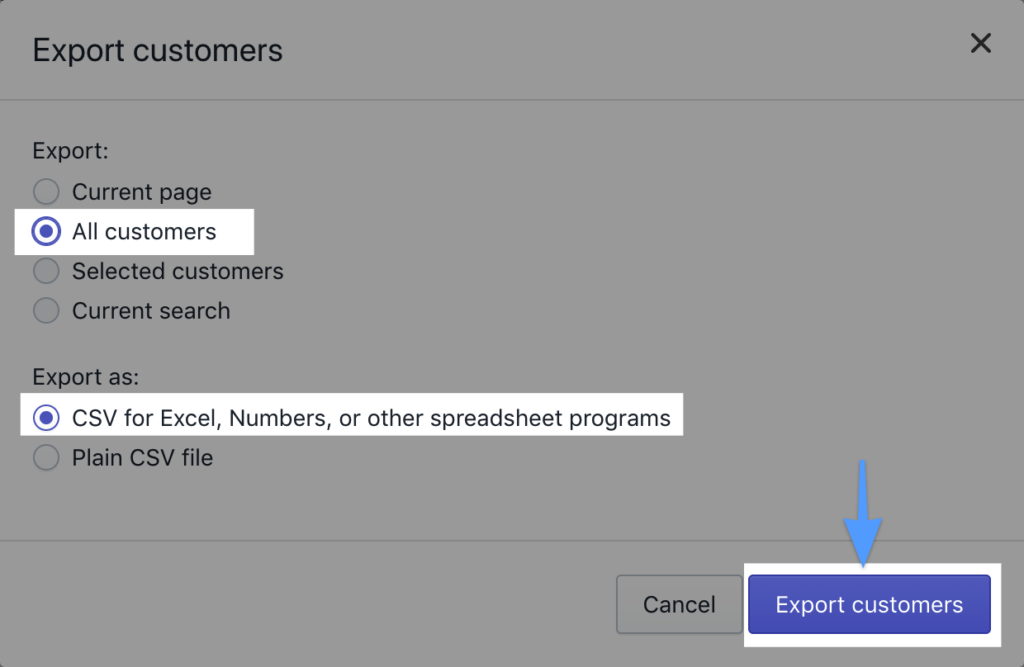
Then select “All Customers” and select “CSV for Excel, Numbers, or other spreadsheet programs”, and finally click “Export Customers”.
Step 4
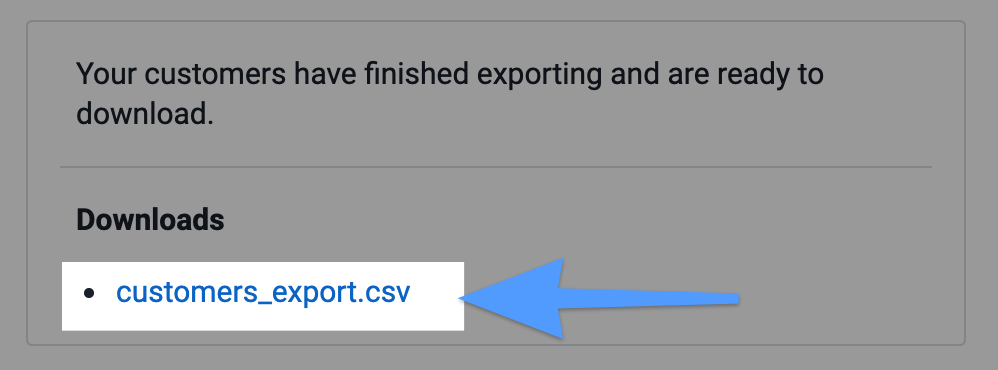
Finally, go to the Store Owner’s email, and download the CSV file.
Before proceeding to part 2, do a quick check of your customers CSV file.
If your CSV file is correct get ready to import your customers from Shopify to WooCommerce in part 2!
2. Import Customers to WooCommerce
Step 1
First, go to WooCommerce site and upload and activate the Customer / Order CSV Import Suite plugin.
Step 2
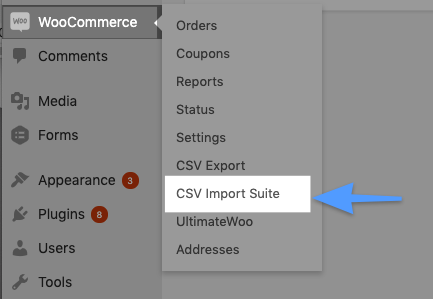
Next, on your WordPress dashboard hover over WooCommerce > click “CSV Import Suite”.
Step 3
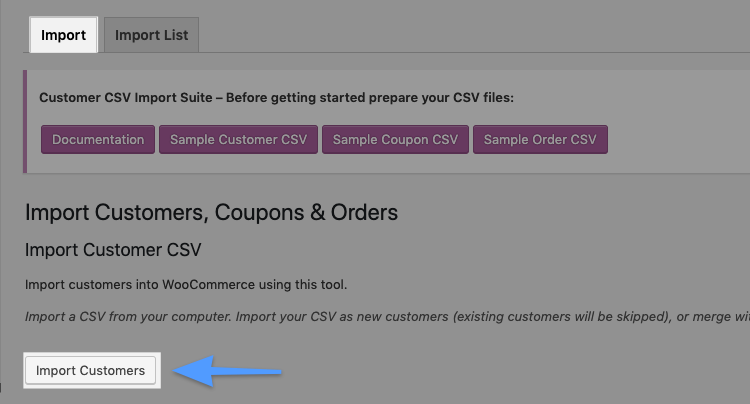
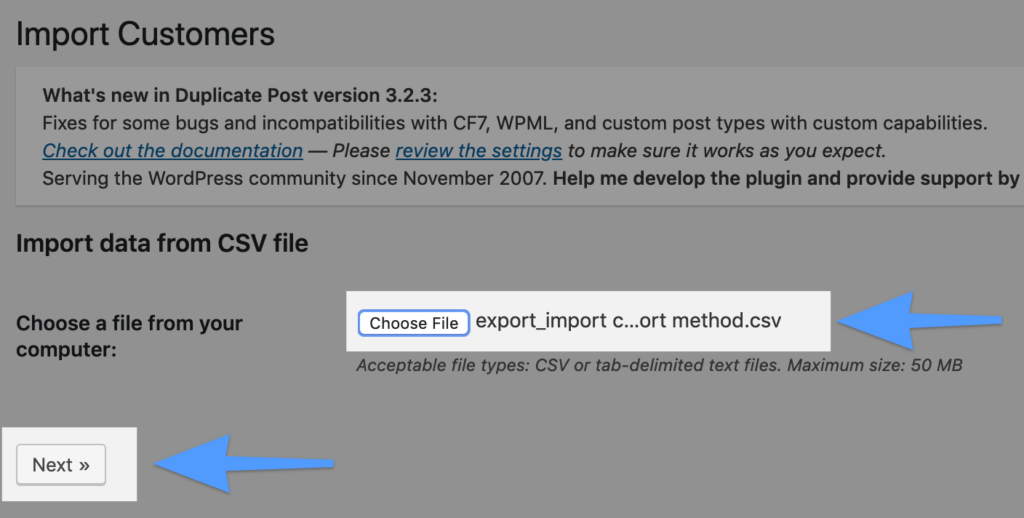
Then, click “Import Customers”, upload your customers CSV file, click “next”, and then and click “Next/Import”.
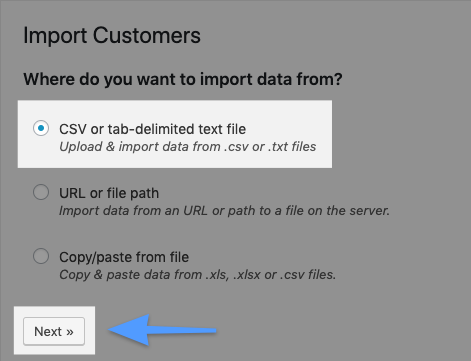
Step 4
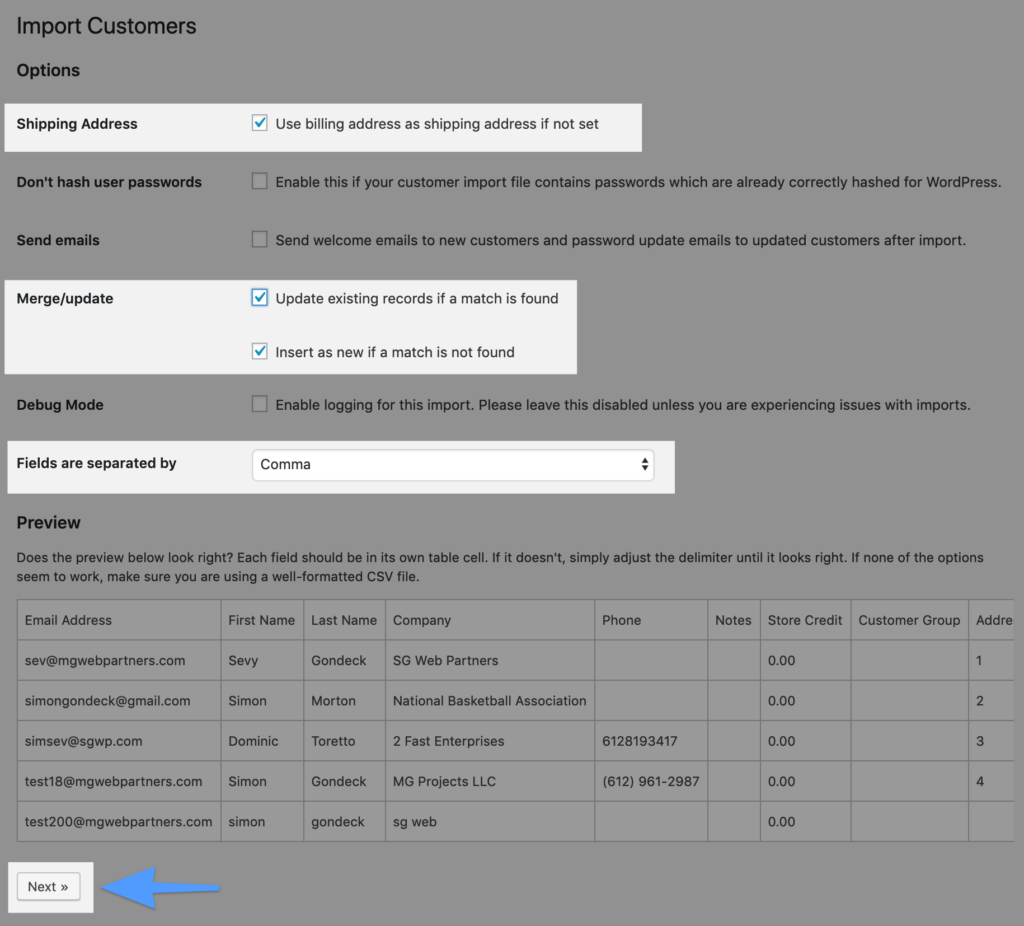
Finally, check the settings settings based on the customers you import and click “Next”.
For example, if a customer does not have a shipping address set, I toggle to use their billing address. In addition, if you are importing customers that could be on WooCommerce already, make sure to check Merge/update.
Pro tip: Make sure to map Email Address, as an Email Address is a requirement when adding or updated a customer in WooCommerce!

After confirming your mapping is setup correctly, scroll down and click “Dry Run”.
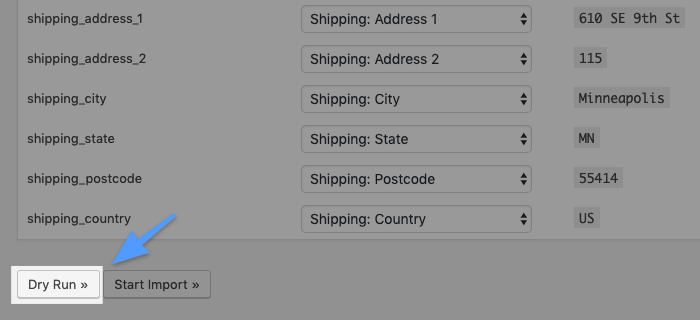
Running as a “Dry Run” will allow you to see how the data is interpreted before running the import.
If I make a mistake and I can always restore to the previous backup point.
When everything is ready to go, click “Run a live import now”.
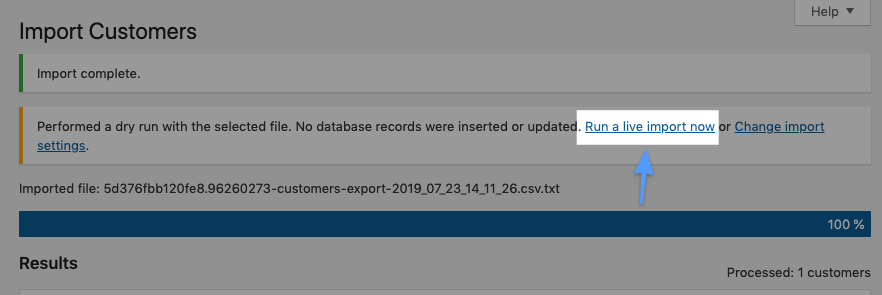
Congrats! You have migrated your customers from Shopify to WooCommerce.

In part 3, we will be exporting your orders from Shopify to WooCommerce.
3. Export Orders from Shopify
Step 1
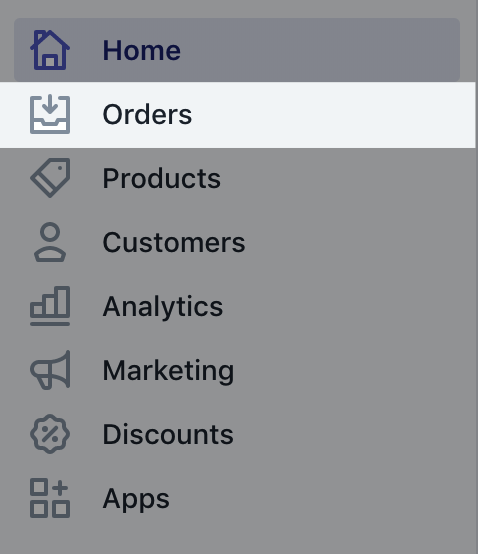
First, go back to Shopify site. On your Shopify dashboard, click “Orders” and click “Export”.

Step 2
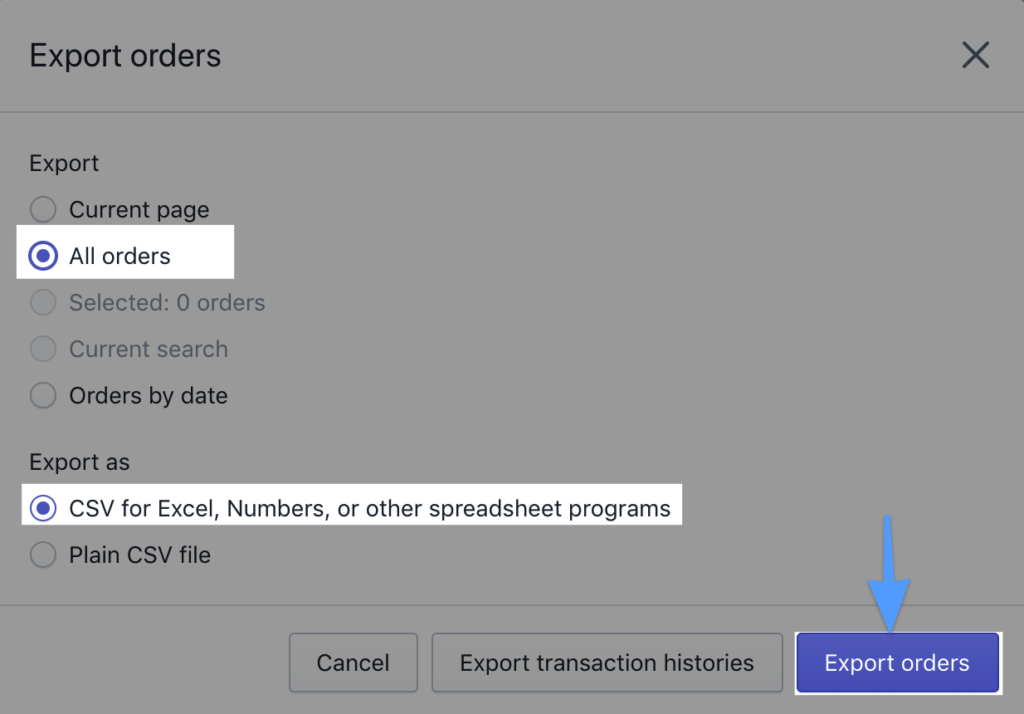
Next, select “All orders” and select “CSV for Excel, or other spreadsheet programs”, and finally click “Export Orders”.
Step 3
When the export is completed, download your CSV file. Next, we will have to reformat the customers CSV file in steps 4-8.
Pro tip: Upload your CSV file to Google Sheets to easily update your CSV file.
Step 4-Remove “#” in Name row
First, go to your CSV file that you just exported from Shopify, go to the “Name” column (This should be Column A). We need to remove the # symbol from all rows in Column A, so highlight all the rows in the “Name” Column.
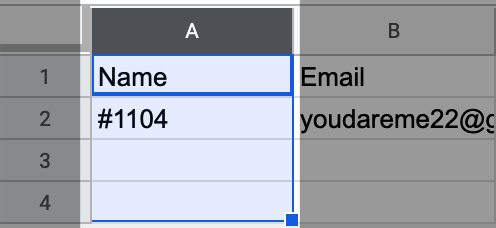
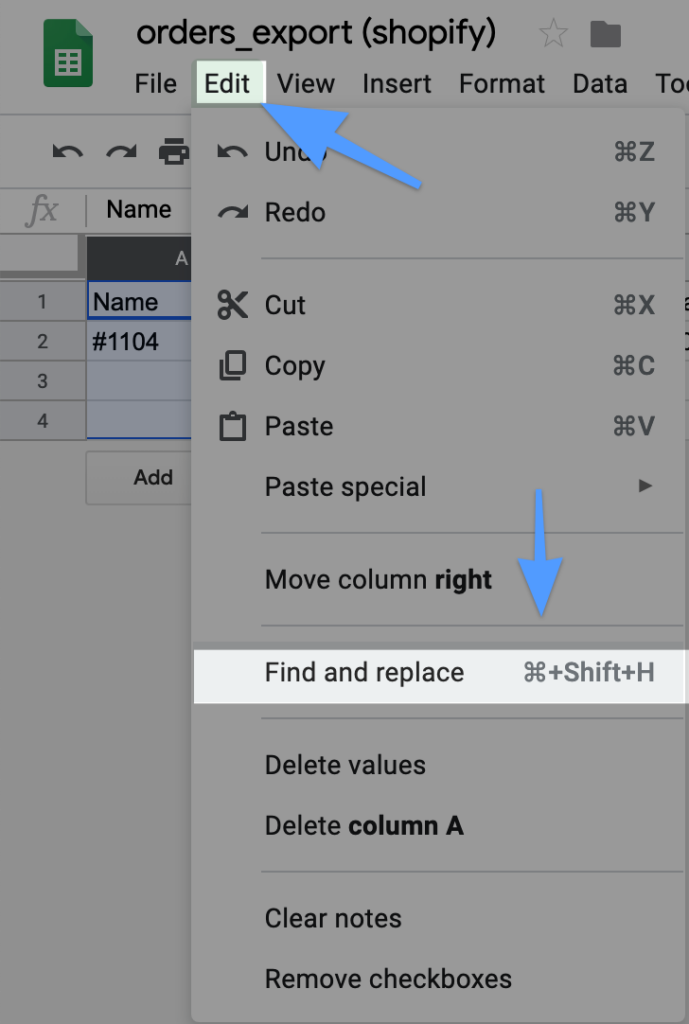
Next, on the top menu, click “Edit” and then click “Find and replace”
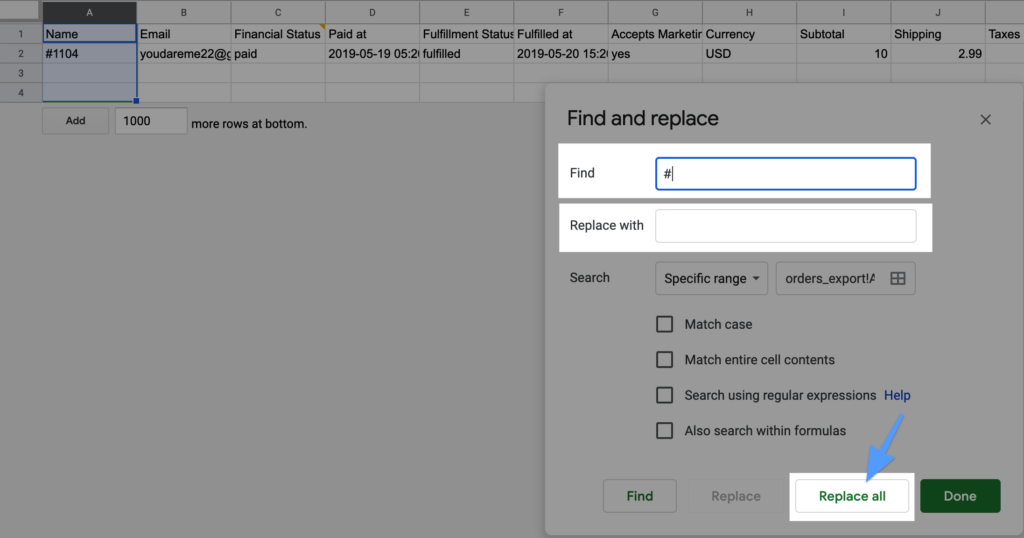
Next, on the “Find” field, type “#”, and on the “Replace with” field, leave blank. Then click “Replace all” at the bottom.
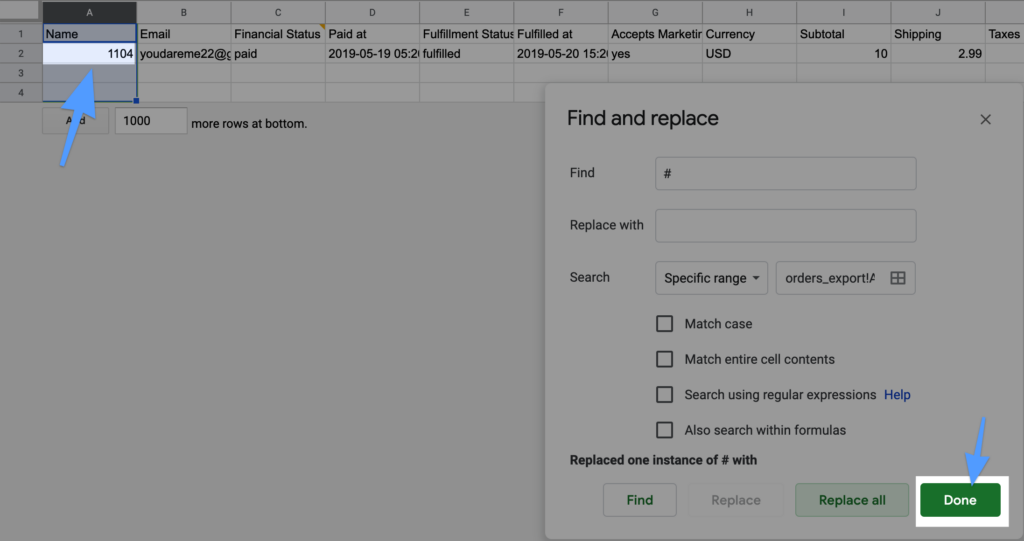
Next, click “done” at the bottom of the “Find and replace” pop-up window. You will notice that the “#” has been removed from all rows in the “Name” Column.
Step 5-Rename Shopify Column Names
Next, we need to to change column names so when we import the CSV file into WooCommerce, so WooCommerce can recognize and map the fields correctly. Note, it is a requirement that these names are changed, and these names need to be changed exactly to what I provided below, or else we will not need be able to import your order information into WooCommerce correctly.
| Shopify Column Name | WooCommerce Column Name |
|---|---|
| Name | order_id |
| Lineitem quantity | item_quantity |
| Lineitem name | item_name |
| Lineitem price | item_total |
| Lineitem sku | item_sku |
| Tax 1 Value | item_tax |
| (**Column does not exist on Shopify**) | item_meta |
Step 6-Add Item_Meta Column
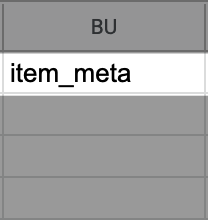
Next, create a new column called item_meta. Note, it doesn’t matter where this column is inserted on the CSV file, but I inserted this column as the last column on my excel file.
Step 7-Split Shopify Column Names
You may want to make some changes to your CSV file, such as splitting column names to match up perfectly with WooCommerce. For example, you would potentially want to split Shopify’s “billing name” column (Sevy Gondeck) up into “billing first name” (Sevy) and “billing last name” (Gondeck) columns. Before you start, make sure there a few empty columns to the right of your column, so you will have room to split out your text.
Thus, you first want to insert 2 columns to the right of the “billing name” column.

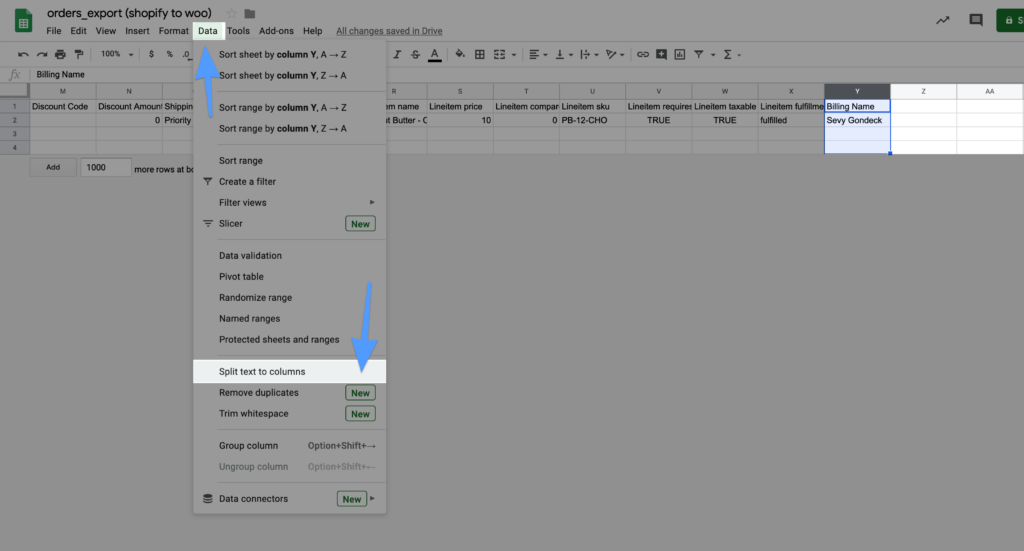
Next, highlight the “billing name” column and click on “Data” tab in the top menu, and then click “Split text to columns”
That will open the split text dialog in Google Docs, so you can then choose how to separate your text. Because I am splitting a list of names, I will split the text based on space.
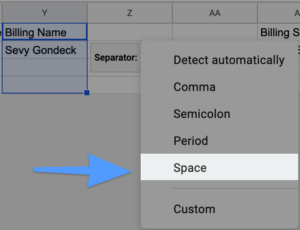
Finally, after you have split out your text, don’t forget to rename your columns, as well as delete all columns that weren’t used when splitting.

Step 8-Shopify Order Differences/Order Status Mapping
Finally, please note that Shopify and WooCommerce have different methods of order status, and thus, the way each both map these line item fields in a CSV file are different as well.
For example, Shopify has two different order status fields, “Fulfillment status” and “Financial Status”, and here are the different options for both fields:
- Fulfillment status: Fulfilled, Pending, Unfulfilled
- Financial Status: Paid, Pending Payment, Partially-Paid, Refunded, Partially-Refunded
In comparison, WooCommerce only uses the “order_status” field that represents a mixture of both the “Fulfillment Status” and “Financial Status”, and here are the different options of the “order_status” field:
- Order_Status: Completed, Processing, On-Hold, Pending Payment, Refunded, Cancelled, Failed
As a result, when we import into WooCommerce, we will need to first reorganize our CSV file and go through both the “Fulfillment status” and “Financial Status” columns to see what type of “Order Status” it should be. I have given you 2 options to complete this task. Note, that unless you’re a B2B Ecommerce website or you have hundreds of orders per day on your B2C Ecommerce site, I would highly recommend doing option 1!
Option #1: Only Migrate Paid and Fulfilled Orders
First, I would recommend full-filling all paid orders before migration. To check to see if you have done this, go to your CSV file and then go to the “Financial Status” and “Fulfillment Status” column and check for all paid orders that have not been fulfilled. I would ship all unfulfilled or pending orders before migration.

Second, I would then export all non paid orders and all non fulfilled orders to another CSV file. I would review these after you have completed your initial migration to see if any of these orders should even be migrated over to WooCommerce. Note, that many times, these are a very small percentage (i.e. less than 1%), and typically that don’t need to be migrated as there were orders that show in the CSV file but should’ve been delete a long time ago.
Third, I would then delete all of the non paid orders and all non fulfilled orders from your primary CSV file.
Fourth, I would delete the following 2 columns from your CSV file:
Fulfillment StatusFulfilled at

Lastly, rename the Financial Status Column to Order Status and change paid to completed. To do this, highlight Column D > click Edit > Find and Replace. Next, find “paid”, replace all to “completed”. Finally, find “Financial Status”, replace to “Order_Status”.

Option #2: Migrate all different Order Statuses within “Financial Status” and “Fulfillment Status” to WooCommerce Order Status
The reason I do not recommend this method is that this can get really confusing really fast for two different reasons:
- Unless you’re doing big volume, many of the un-paid or unfulfilled order statuses that you exported are order data that will never turn into paid or unfulfilled orders (especially for smaller businesses). For example, a customer places an online order on your Ecommerce Store. They realize that they made a mistake to the order, and call your store support team, to ask to change the order. The support team may create a new order, and place the other order on-hold or as refunded, and never 100% delete that customer’s initial order. Thus, the first order that the customer technically cancelled is never deleted from the order history, and it is best to just delete that data before migration.
- Each WooCommerce store is setup different and may have their own customized workflow. For example, on my WooCommerce site, I only use 3 different order statuses: Completed, Processing, On-hold. Anyways, I still wanted to provide you with an example of all the different order status options WooCommerce offers. For example, under the “Fulfillment Status” and “Financial Status” columns, here is what you would change the following fields to:
| WooCommerce Order Status | Shopify Paid? | Shopify Fulfilled? | |
|---|---|---|---|
| Completed | X | X | |
| Processing | X | ||
| On-hold | |||
| Pending Payment | |||
| Refunded | |||
| Cancelled | |||
| Failed |
Example of Order Statuses Mapping (Shopify → WooCommerce)
Paid→ CompletedAuthorized→ ProcessingPending→ Pending paymentPartially Paid→ Pending paymentPartially Refunded→ On HoldRefundedVoided→ Failed
Pro tip: I realize this can get your head spinning a little bit, so depending on your workflow and how your Ecommerce Site is set up, orders that have not yet been paid, you can label these as “pending payment” or “on-hold” depending on your workflow.
Before proceeding to part 4, do a quick check of your orders CSV file.
If your CSV file is correct get ready to import your orders from Shopify to WooCommerce in part 4!
4. Import Orders to WooCommerce
Before importing your orders, I would highly recommend taking a backup of WooCommerce!
Are you only importing/exporting orders? If you have not done so already, purchase, download and activate the Customer / Order CSV Import Suite plugin on WooCommerce.
Step 1
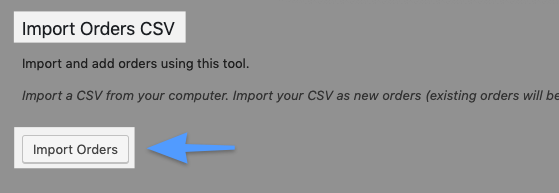
First, navigate to WooCommerce and on your WordPress dashboard hover over WooCommerce, click “CSV Import Suite”.

Then click “Import Orders”.
Step 2
Next, upload your Orders CSV file, click “Next” and configure the options.
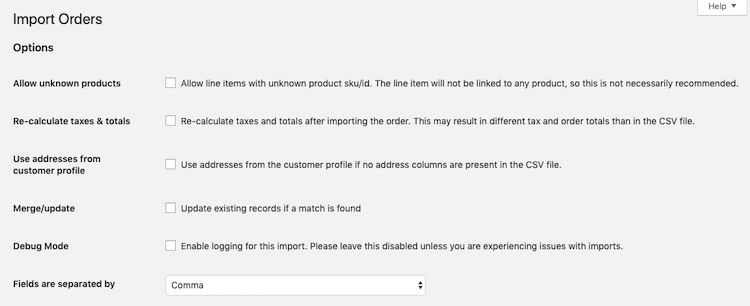
When finished, click “Next”.
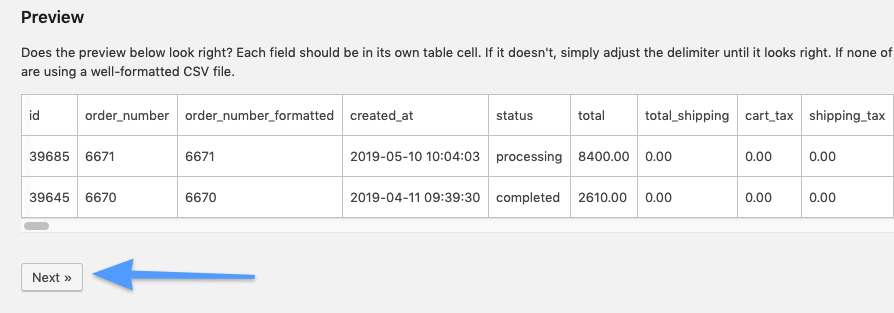
Pro tip: If your product SKUs have changed and want to import products with an updated SKU, open up your Orders CSV file, and run a search and replace on the product SKUs that have been updated before importing your orders.
Step 3
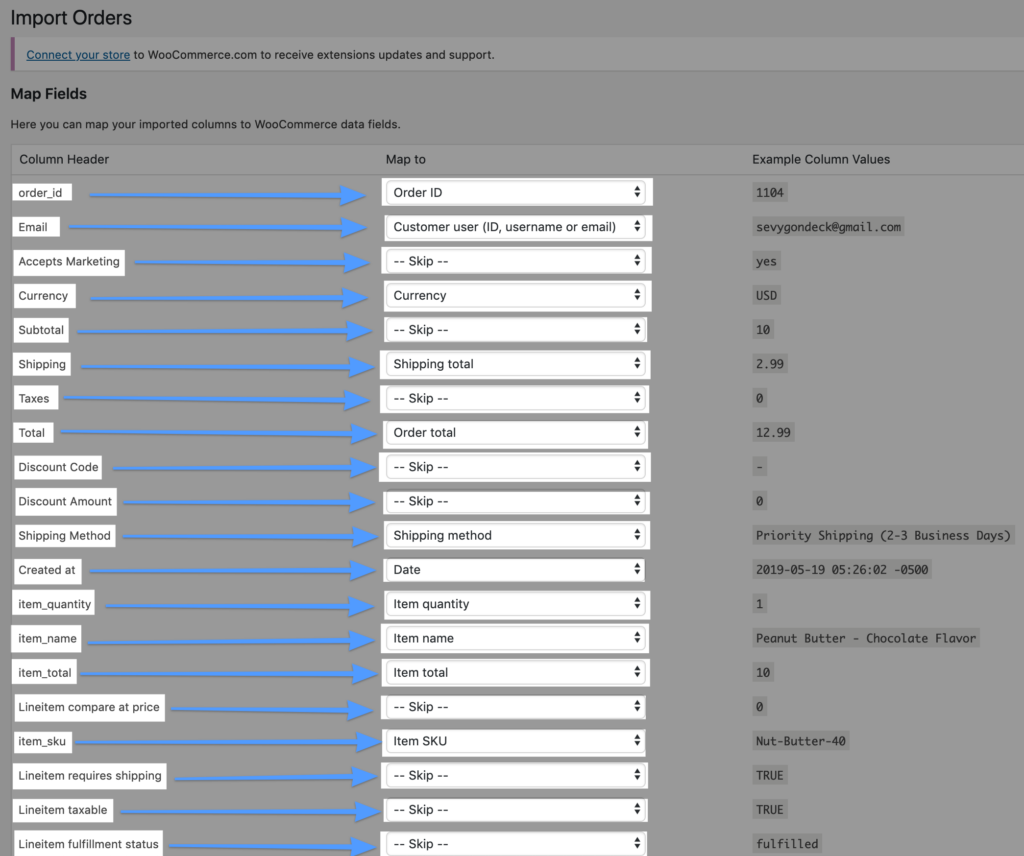
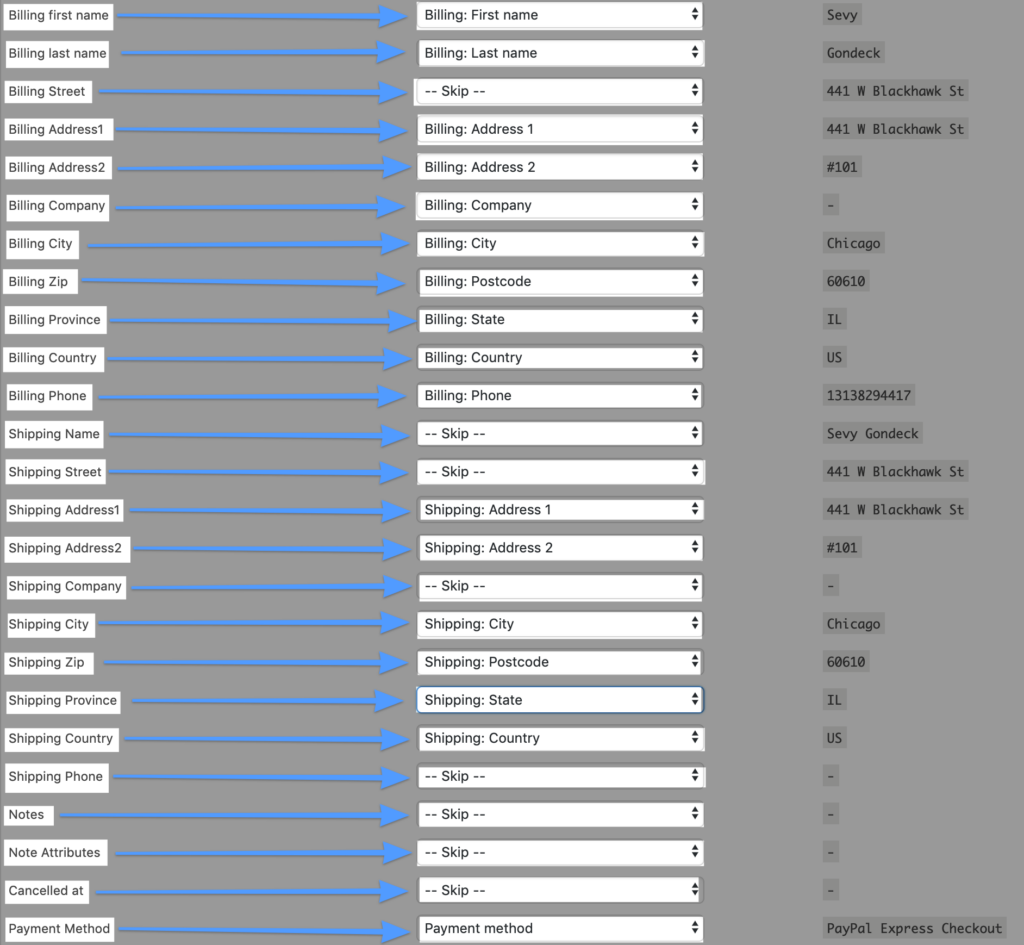
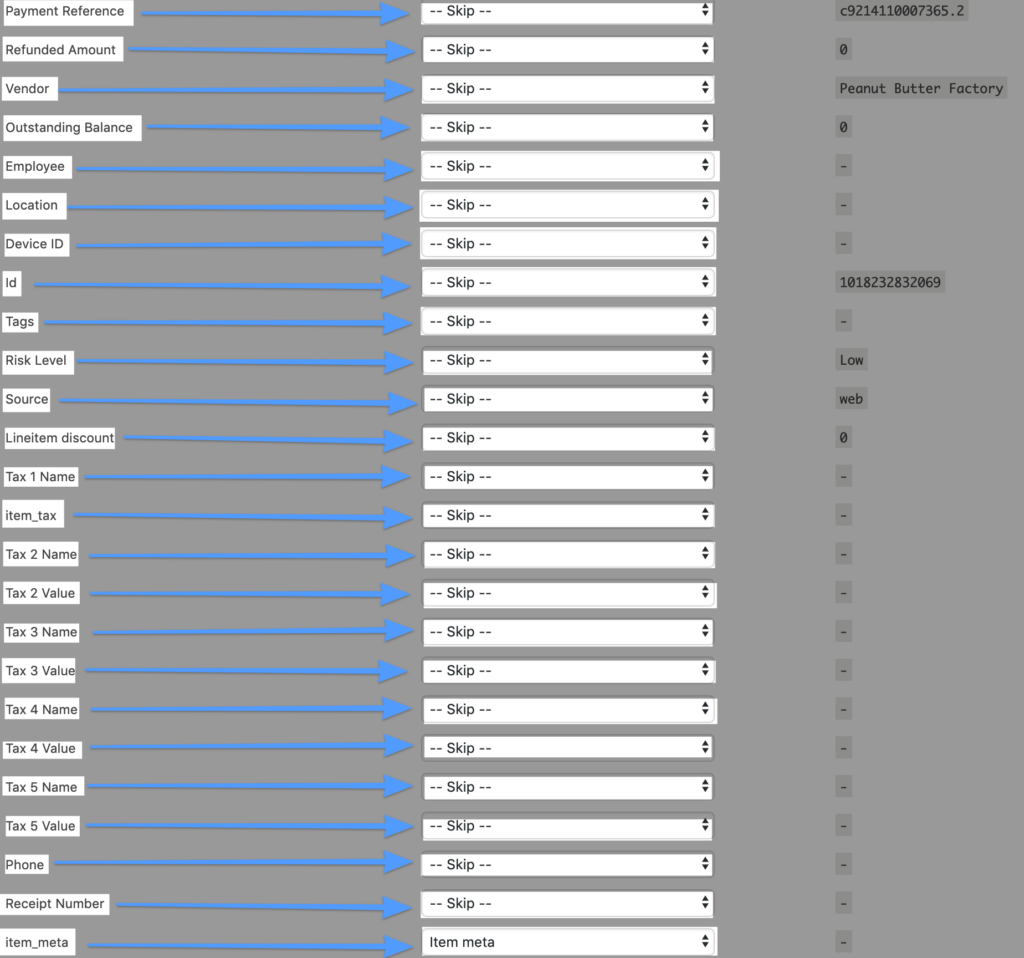
Then, make sure your Orders CSV file is mapped properly.
At the end of step 3, I have provided a screenshot with how all of my fields are mapped for importing. But first, I would want to review these 4 fields to make sure that you’re mapping them correctly during importing:
- order_id → Order ID
- Email → Customer user (ID, username, or email)
- item_sku → Item SKU
- id → –Skip–
First, it is important that you map the fields exactly to what I have below!
Here is the correct and not correct way to map the fields:
- Correct: order_id → Order ID
- Not Correct:
order_id → –Skip–

Second, it is important that you match email → Customer user (ID, username, or email)
Here is the correct and not correct way to map the fields:
- Correct: Email → Customer user (ID, username, or email)
- Not Correct:
Email → –Skip–

Third, it is important that you match item_sku → Item SKU. Further, a lot of people also forget to import their products into WooCommerce before they’re migrating their order, so make sure that the Product SKU you’re importing (Nut-Butter-40), must match a WooCommerce SKU, or else you will not be able to import this order.

Finally, it is important that you skip the Id column. By default, a lot of people mess this up by confusing order_id with id. Here is the correct and not correct way to map the fields:
- Correct: id → –Skip–
- Not Correct:
id → Order ID - Not Correct:
id → Order Number

Here is a screenshot below of how I have mapped all of these of my fields mapped for importing.
Step 4
When finished mapping the fields, scroll to the bottom of the page and click “Dry Run”.
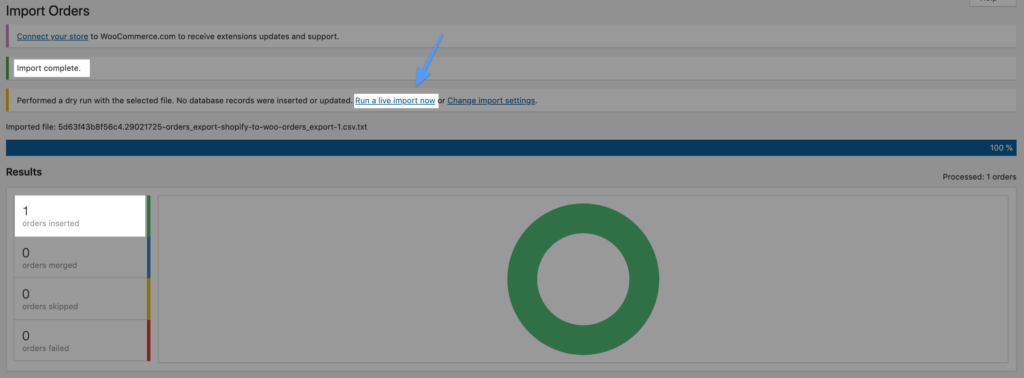
Finally, if everything went smoothly, click “Run a live import now”.
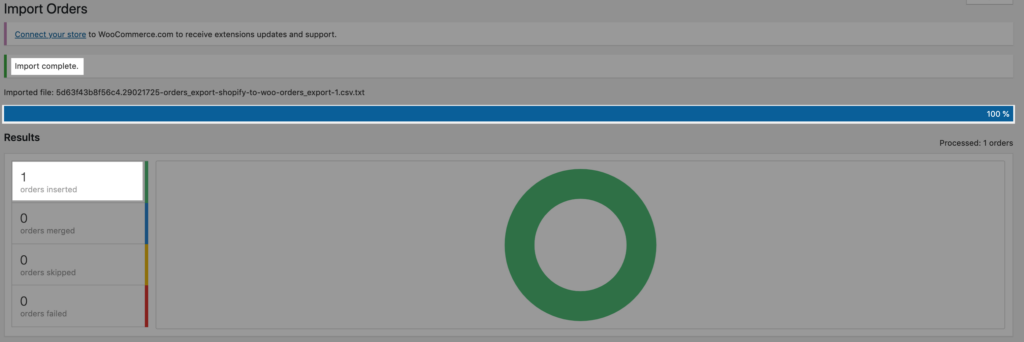
Congratulations! You have migrated your orders and customers from Shopify to WooCommerce!
Frequently Asked Questions
Do you have a tutorial on how to Migrate WooCommerce Orders & Customers to WooCommerce?
Yes, please see the blog post and video tutorial here:
Blog Post: How To Migrate WooCommerce Customers and Orders (Like A Pro!)
Video Tutorial: How to Migrate WooCommerce Orders (Like A Pro!)
Can I migrate and export Customer’s passwords from Shopify to WooCommerce?
Since customer accounts that were connected to your previous online store were set up using privacy protection unique to Shopify, you are not able to export your customer’s passwords. Thus, all of your customers need to create a new password with WooCommerce after migration.
Additional Resources
- Woocommerce Docs: Customer / Order CSV Import
- Shopify Docs: Export existing customers to a CSV file
- Shopify Docs: Export orders to a CSV file
- Shopify Docs: Export Products to a CSV file
- BobWP: How to Export and Import Your WooCommerce Customers, Orders and Subscriptions
- Liquid Web: How to Migrate from Shopify to WooCommerce
- Cloud Ways: How to Migrate Shopify to WooCommerce
- Cart 2 Cart Migration: Shopify to WooCommerce
- Code Canyon: Import Shopify to WooCommerce – Migrate Your Store from Shopify to WooCommerce
- Web Toffee: Migrating Your ECommerce Store from Shopify to WooCommerce
- Learn Woo: How to Migrate your Online Store from Shopify to WooCommerce
Hey I am trying to import my Shopify order data into Woocommerce using the plugin, but when I want to map to item_sku → Item SKU, I can’t find “Item SKU” in the drop down. Neither can I find “item name”, “Item quantity”, “Item total”. Been struggling for hours!
Same thing for me – very frustrating!