In this guide, learn how to setup PayPal for your WooCommerce store.
To use PayPal, you must have a PayPal Business account.
If you are more of a visual learner, follow along to my tutorial video (over 99,000 views) where I outline everything in the steps below.
If you have never added PayPal to your WooCommerce store you have to use the updated plugin that is PayPal’s all-in-one checkout solution using the PayPal Payments extension. Use this video below to setup PayPal Payments.
Let’s jump into it!
- Enable PayPal in WooCommerce
- Get NVP/SOAP Integration (Classic) credentials
- Enable Instant Payment Notifications (IPN)
- Add auto return url and identity token
- Add your brand’s logo
- How to setup PayPal sandbox account on WooCommerce?
- Video
Step 1: Enable PayPal in WooCommerce
The first step is to go to your WordPress dashboard, hover over WooCommerce, and go to Settings.
Next, click the Payments tab.
Then, enable the PayPal payment method and click Setup.
Next, add in your PayPal email address.
Quick Tip: You need to create a PayPal Business account to use PayPal on WooCommerce.
Step 2: Get NVP/SOAP Integration (Classic) credentials
Next, open up a new tab and go to PayPal.com. Sign in to PayPal.
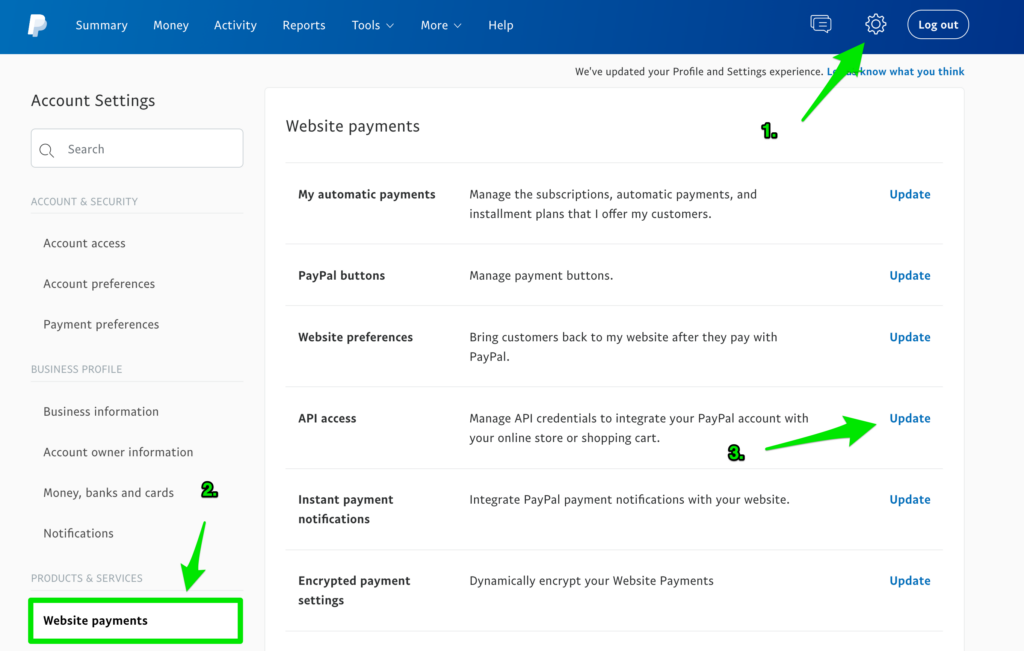
On your PayPal dashboard, click the “Settings” icon in the top right hand corner and then “Website Payments” under the Products & Services sidebar menu. Then, click “Update” on API Access.
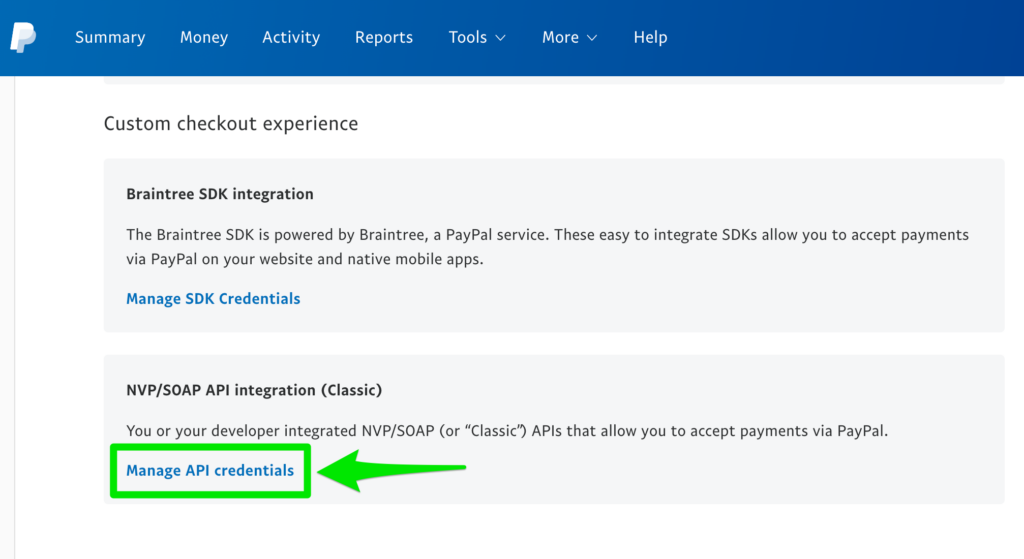
Next, scroll down to “NVP/SOAP Integration (Classic)” heading and click “Manage API credentials”.
Then, you will be to view your API Username, API Password, and Signature. Copy these values.
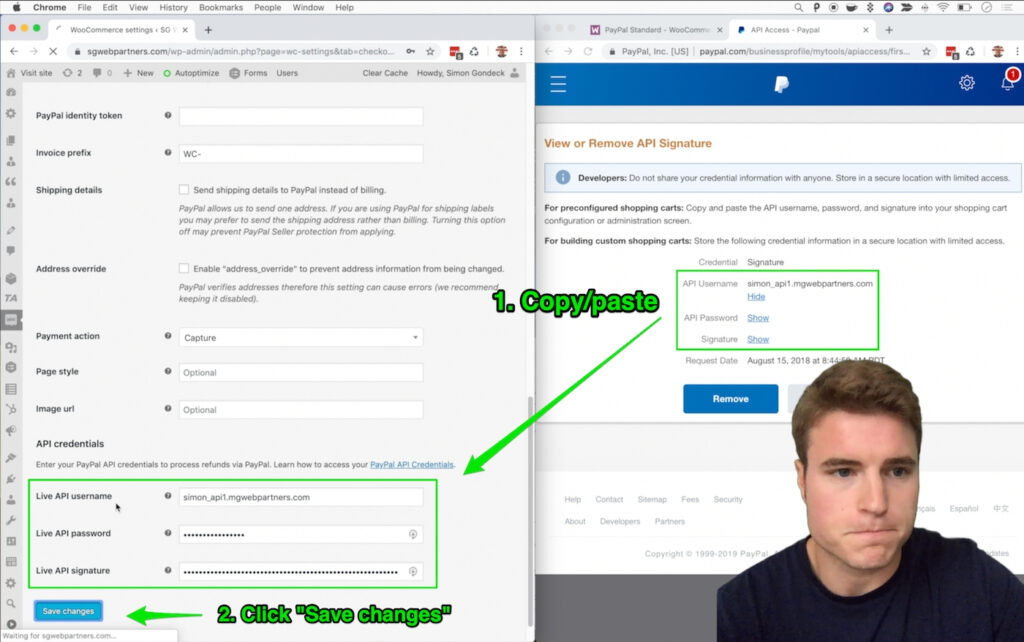
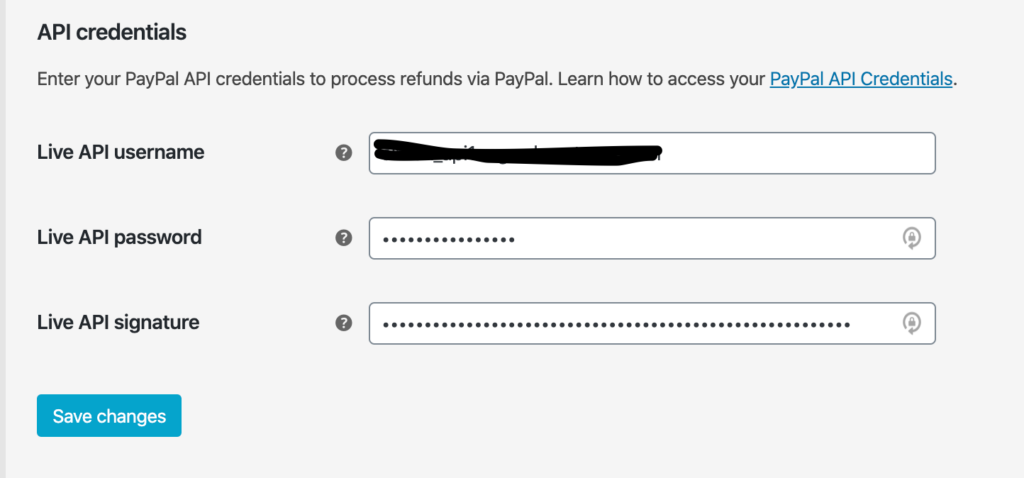
Finally, paste these values in the API credentials section. Save Changes.
Step 3: Enable Instant Payment Notifications (IPN)
If you want to enable Instant Payment Notifications, click “Enable IPN email notifications” on your PayPal settings in WooCommerce.

Next, go back to your PayPal settings > Website payments. Under API access click Update.
Then, click Choose IPN Settings and add your notification URL.
https://your-domain.com/?wc-api=WC_Gateway_Paypal
Finally, toggle to Receive IPN messages and Save.

Step 4: Add auto return url and identity token
Enabling the auto return url will allow a customer to return to your Order Received page after payment. This is important as one of your customers may want to shop around, read another blog post, get more engaged with your brand, etc.
Navigate back to PayPal settings > Website payments. Click update under Website preferences.
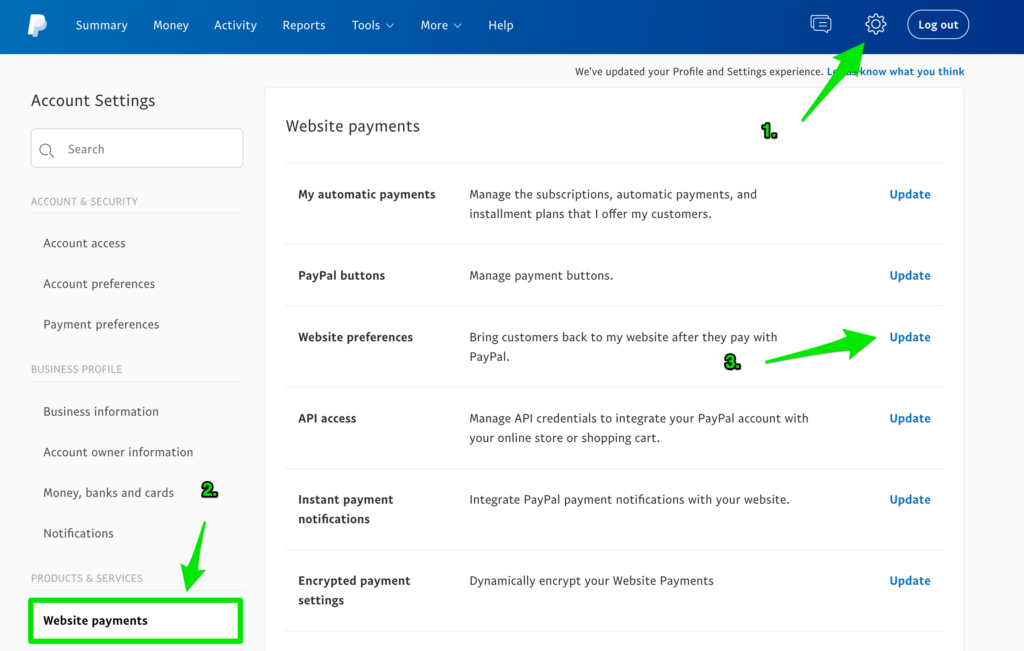
Next, add your auto return URL. Replace the domain below with your own.
https://your-domain.com/checkout/order-received/
Then, copy the identity token and paste into your PayPal settings in WooCommerce.

Save changes.
Step 5: Add your brand’s logo
Upload your brand’s logo to WordPress. PayPal recommends dimensions of 150 pixels x 50 pixels. You could also do 50 pixels x 50 pixels (this is what I do!).
Next, copy the image source url.
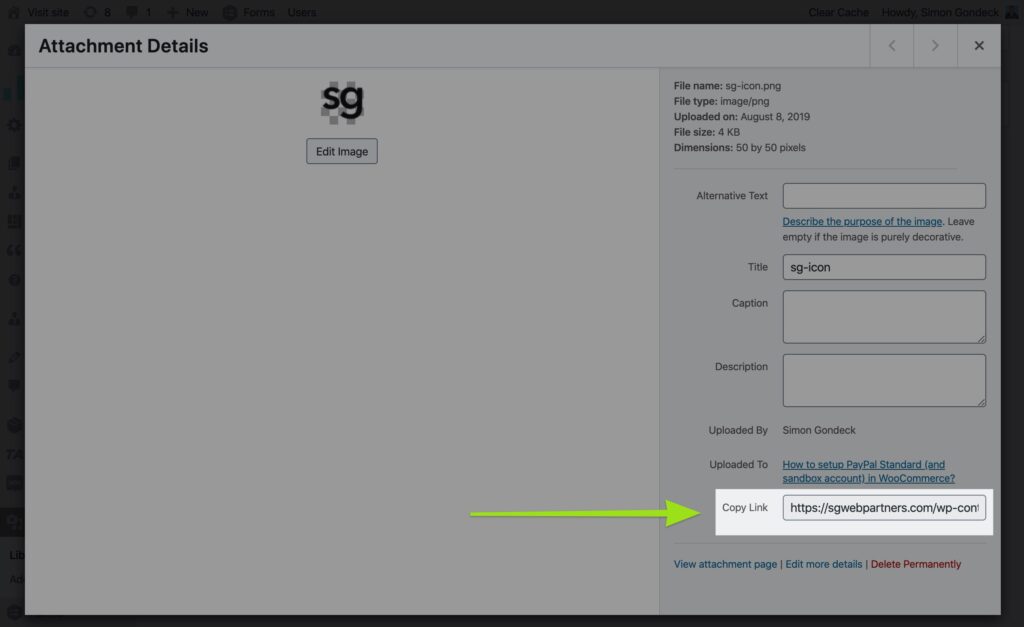
Then, in your PayPal settings in WooCommerce, paste the source url. Save changes.

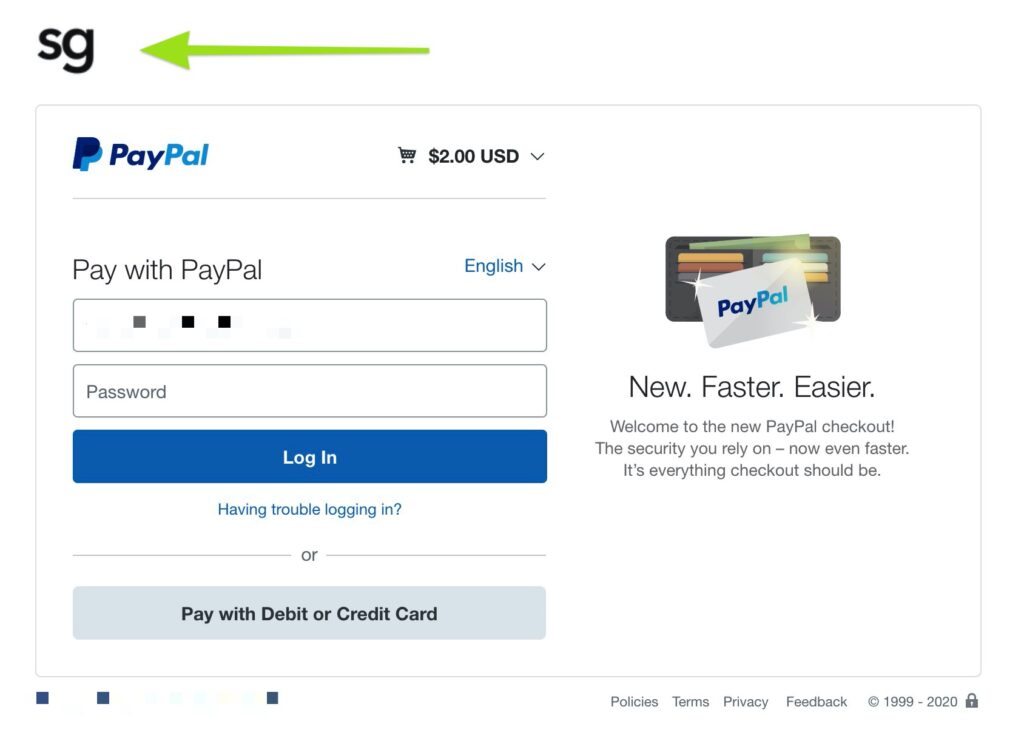
Finally, do a live transaction on your site using PayPal Standard. Is your brand’s logo showing up?
How to setup PayPal sandbox account on WooCommerce?
On your WordPress dashboard, hover over WooCommerce and click Settings.
Next, click the Payments tab and click Manage next to PayPal.
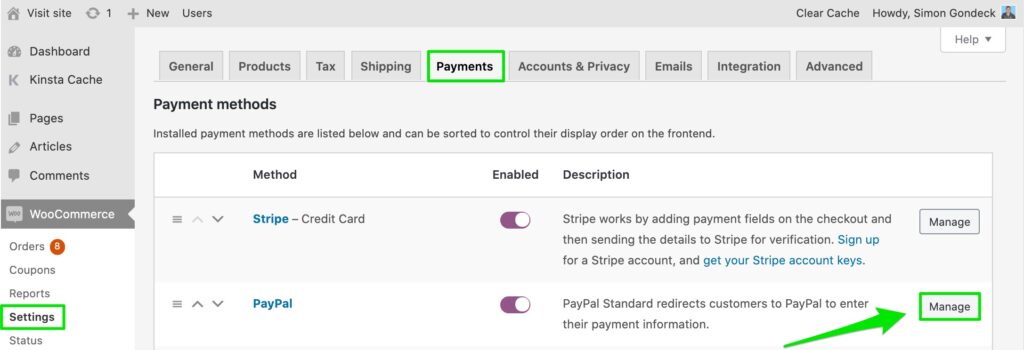
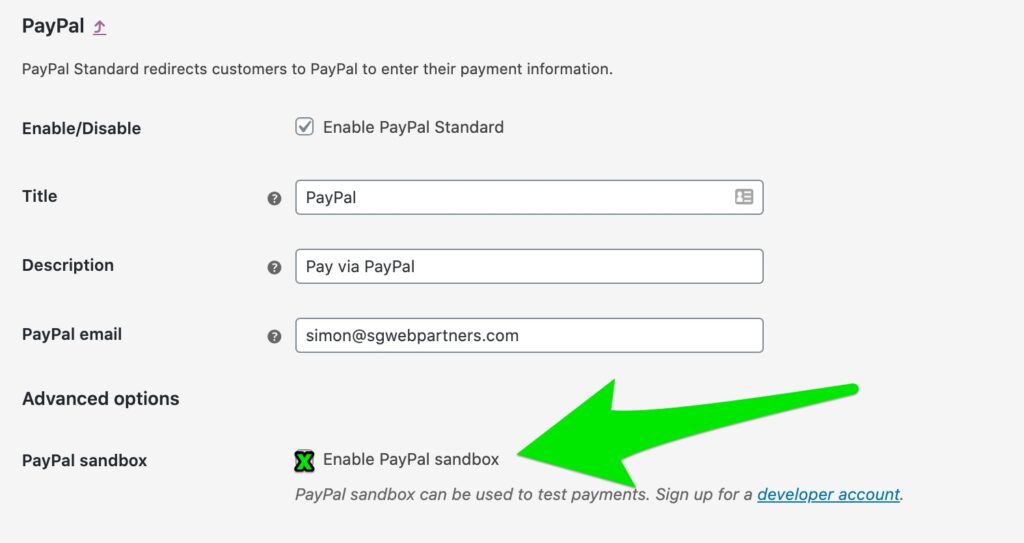
Under Advanced Options, find “PayPal sandbox” and click “Enable PayPal sandbox”.
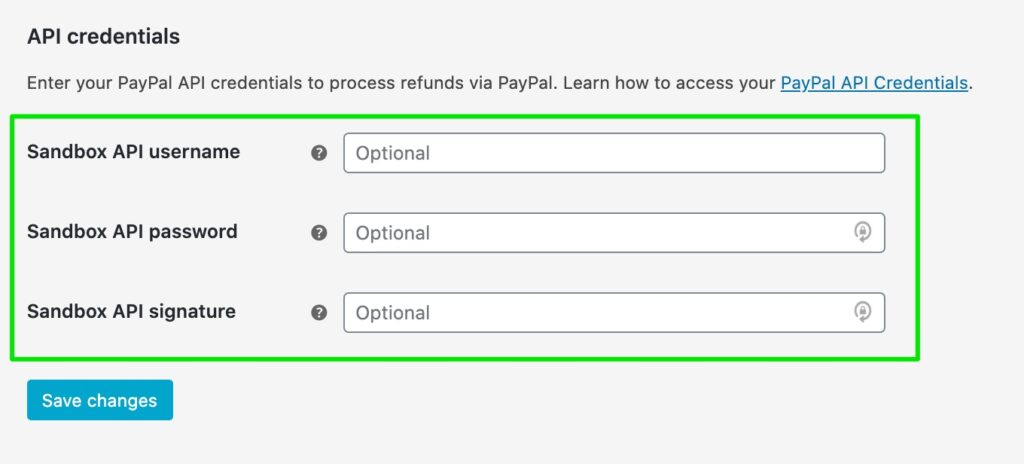
If you scroll to the bottom of your PayPal settings page, you will notice we need to insert our Sandbox API username, Sandbox API password, and Sandbox API signature.
To get these we need to go to your PayPal Developer account and Sign In. If you do not have a account, sign up for free in less than 5 seconds.
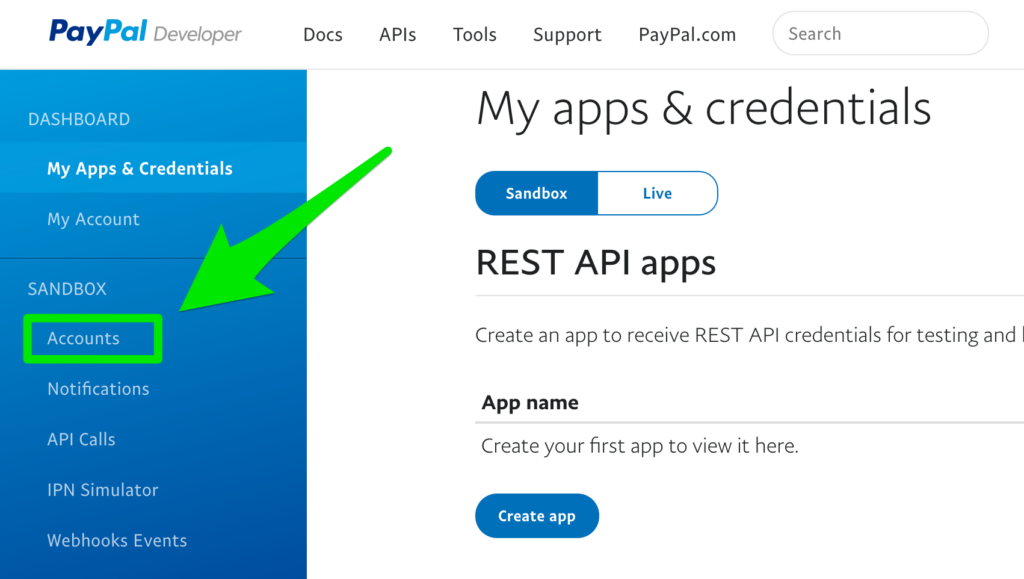
On your PayPal Developer Dashboard, under the Sandbox menu click Accounts.
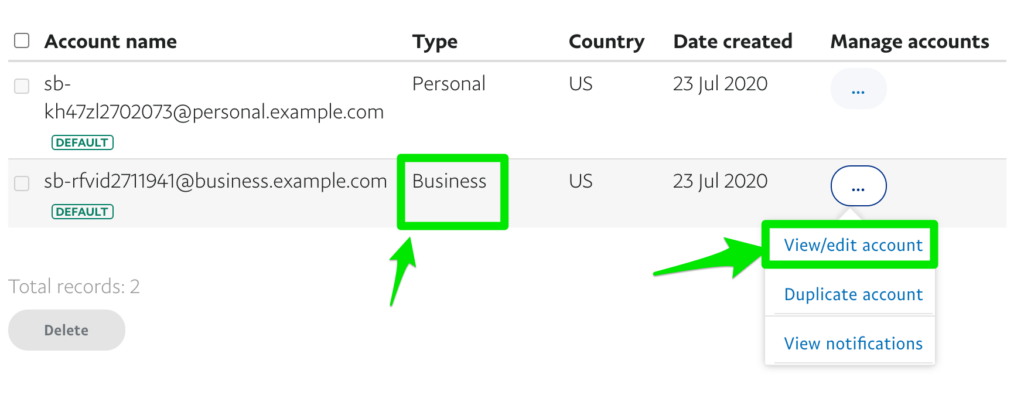
Then, on the Sandbox Test Accounts page, you will see 2 accounts already created. 1 is a business account and he other is a personal account.
Hover over the Manage Accounts tab for the ‘Business’ account and click “View/edit account” to see your Account Details.
Toggle the tab from “Profile” to “API Credentials”. Then, copy the Username, Password, and Signature.
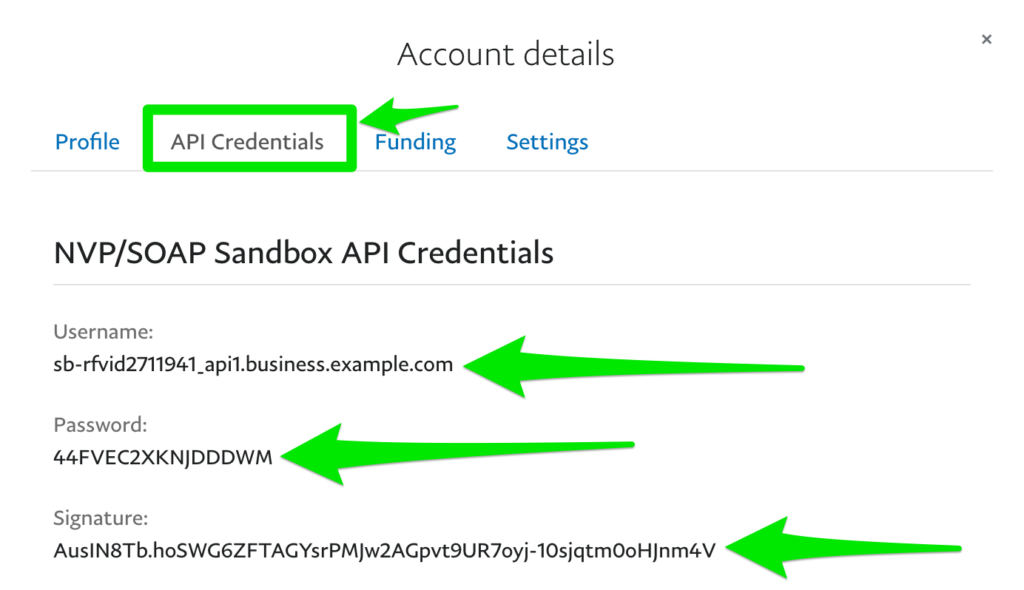
Finally, go back to your WooCommerce PayPal sandbox settings and paste the Username, Password, and Signature.
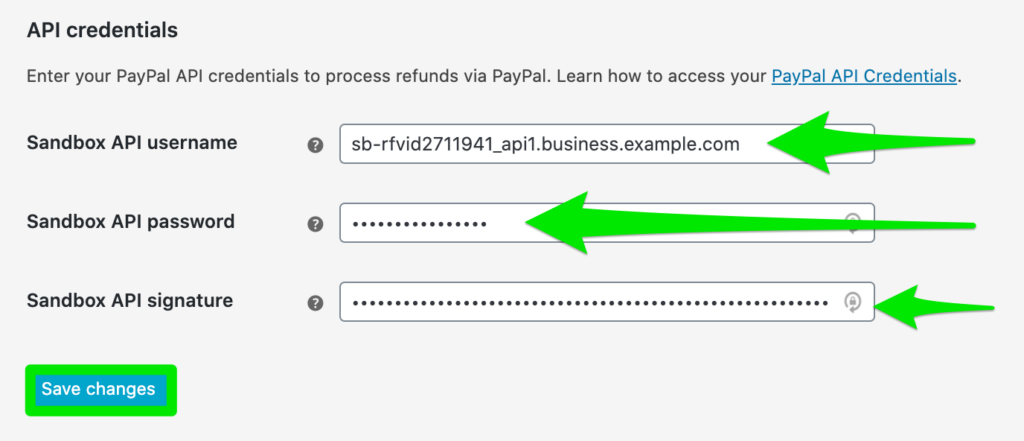
When finished, click Save changes at the bottom of the page.
Your sandbox account is all set up. The next step is to create a sandbox personal account to test transactions.
FAQs
How can I test transactions on WooCommerce using PayPal?
To test live transactions on your site, you will need to setup a PayPal sandbox personal account.
First, go back to your PayPal Developer account dashboard and click “Accounts” on the Sandbox menu.
Next, click “Create Account” and create a Personal Account. After creating your personal account, copy your email address and password.
Then, go back to your WooCommerce store, go to a product page, add the product to Cart, and go to your Checkout page.
How do I know sandbox mode is enabled? On the Checkout page, you will notice the “SANDBOX ENABLED” shows up next to the PayPal payment method.
Finally, click Proceed to PayPal and enter in your personal sandbox account email address and password to complete your test transaction. After your payment has been made, go back to your WooCommerce backend, click “Orders” to see your test order.
I have ‘pending order’ in my WooCommerce dashboard, but no payment was received in my PayPal account.
If the customer abandons the order in PayPal (and not your WooCommerce store), the order shows as Pending (unpaid).
How to create a sandbox account for PayPal Standard?
Looking to also setup a PayPal sandbox account to test transactions? See the video below:
Do I need a PayPal Business account to use PayPal plugin?
Yes, to use PayPal on your WooCommerce store, you must have a PayPal Business account.
Will PayPal Standard work with WooCommerce Subscriptions?
Yes it will but there are limitations (see bottom of this FAQ).
To enable PayPal Standard to work with Subscriptions, do the following steps:
- On your WordPress dashboard, hover over WooCommerce and click ‘Settings’
- Next, click the ‘Payments’ tab and then click ‘Manage’ in the PayPal Standard row
- Then, check ‘Enable PayPal Standard for Subscriptions’
- Finally, scroll to the bottom of the and click ‘Save changes’
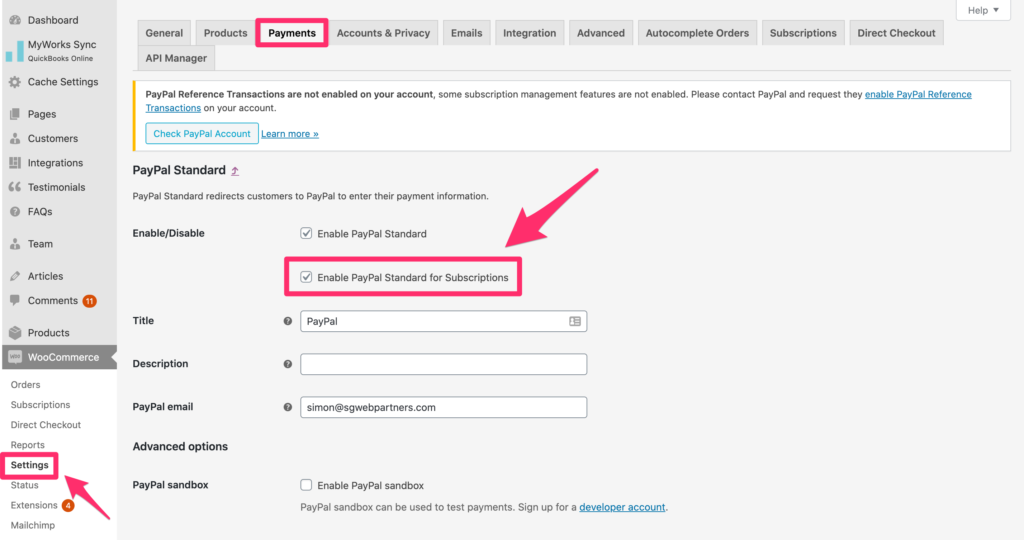


However, if your WooCommerce Subscriptions are setup for the customer to downgrade or upgrade their subscription (i.e. change from 1 month to every 2 months or change recurring total from $50/month to $75/month) you will have to apply for PayPal Reference transactions. in your PayPal dashboard (typically requires subscription revenue to be $2,000/month or higher). Learn more about how to apply here.
Can I use the same PayPal information as my other ecommerce shop?
Yes you can use the same PayPal information. I just would recommend setting the invoice prefix to be different on each store. In addition, login to your PayPal -> Preferences, and set Block accidental payments to “No.” See more details here
On my WooCommerce “Orders” page dashboard, it says “On hold” instead of “completed. Any Suggestions?
When you were checking out using PayPal Sandbox, did you enter in the SAME “sandbox” email and password that you created at https://developer.paypal.com/developer/accounts/? Note, you need to make sure that you enter in a different email when doing test orders.
For example:
PayPal Sandbox (Personal Account): bill@microsoft.com
PayPal Sandbox (Business Account): steve@apple.com
Why do I need to create multiple PayPal Sandbox accounts for my WooCommerce store?
Because you need to create 1 Sandbox account for your store to process payments, and 1 Sandbox account for the customer to process their payment. For example, I started a Ecommerce Store called “Sam’s Shoes” and it is based in Orlando, Florida. I need to create 1 Sandbox account for my store “Sam’s Shoes” so I know I will receive payment when a customer makes an order. I need to create 1 other Sandbox account to simulate a customer (let’s say Katie from Phoenix is making a purchase for some Yeezy’s), so I can test that the customers PayPal account will work properly.
Will PayPal Standard work in my country?
PayPal Standard is available almost anywhere in the world, with certain exceptions due to legal constraints. These countries include the following: Belarus, Burma (Myanmar), Democratic Republic of the Congo, Iran, Iraq, Liberia, Nigeria, North Korea, Sierra Leone, Sudan, Syria, Western Balkans, Zimbabwe.
What do I need to create a PayPal Business account?
To create a PayPal Business account you need the following:
- Valid email address
- Customer service information
- Business address
- Phone number
- Bank name
- Business or personal bank account number.
- Bank routing number
Go to PayPal.com and click “Sign up” for business account.
How to change the “Proceed the PayPal” button text in WooCommerce?
/* = Custom PayPal Button Text
---------------------------------------------------- */
function custom_paypal_button_text( $translated_text, $text, $domain ) {
	switch ( $translated_text ) {
		case 'Proceed to PayPal' :
		$translated_text = __( 'NEW BUTTON TEXT!', 'woocommerce' );
		break;
	}

	return $translated_text;
}

add_filter( 'gettext', 'custom_paypal_button_text', 20, 3 );
Videos
If you see something called “PayPal Standard” on the Payments tab in your WooCommerce settings use the video below.
If you have never added PayPal to your WooCommerce store you have to use the updated plugin that is PayPal’s all-in-one checkout solution using the PayPal Payments extension.
To create a business account with PayPal follow the video below:
If you are having trouble with setting up a sandbox account, follow along to the video tutorial below.
Hi Simon,
great content, thanks a lot! Have you had the same issue: I set up PayPal Standard according to your tutorial. After a successful purchase the customer is redirected to the “order-received” page because I set the return URL in PayPal.
But if the customer clicks on “Cancel and return to shop” in the PayPal Popup then he´ll be redirected to the “order-received” page as well without having done the payment. Is it possible to set a “cancel URL”? I don´t think so.
Have you ever tried this? Do you have an idea?
The PayPal Merchant Support isn´t able to help.
Best Regards
Ingo
Hello,
Paypal Standard is no longer available in the new woocommerce version. woocommerce offers an extension to download: WooCommerce PayPal Payments.
Problem, it offers in addition to the standard payment in one go the possibility of paying in 4 installments. how to remove the “Payment X4”? And impossible to translate some error messages. Paypal Standard was fine. Are there other Paypal extensions for woocommerce? help!
I agree. PayPal Standard was great! Not sure why this big change to this all-in-one solution with PayPal Payments. In the PayPal Payments setting you should see an option to disable Payment X 4. If you cannot find it check the PayPal Payments docs.
Thank you! Very helpful.
Glad it was helpful Christina!
Why i am getting payment hold status in woocomerce.
I am using the same email that i just created on sandbox
Hey. is it possible to change the currencies?
The Country/Region will determine the currency of your sandbox account, which should match your site’s currency.
For example, if you want to use British pounds you would select your Country as “United Kingdom” and then update your WooCommerce > Settings > General > Currency > Pound Sterling. Or, if you wanted to use US Dollar, you would create a sandbox account as “United Stats” and update WooCommerce currency to United States dollar.
Hi Sam, nice article, i need build a new woocommerce store. but i only have one business paypal account. it seem only one IPN and paypal id token can be setup in paypal. which means my new store can’t be add on paypal for IPN and return url. for multiple woocommerce stores, how fix these issue? look forward your hint!
Hey Jie, I would not set a IPN. Instead, go to WooCommerce > Settings > Checkout > PayPal and set a unique ‘prefix’ for your store. For example, set “STORE-1” for one store, set “STORE-2” as the invoice prefix for another store, etc. Overall, test to see if PayPal is working without a IPN. You could also check out this post that goes into more depth about multiple IPN urls but I have never used: https://puri.io/blog/how-to-use-paypal-ipn-on-multiple-woocommerce-sites/
Hi Simon,
Thanks for the tutorial. It worked and easy to use. I appreciate your post!
Yes for sure – glad it was helpful Alberto!
Thank you for your tutorials. I followed it through. But the money only shows that it went through on my woocommerce dashboard and not in my PayPal business account. S they in sync real time?
Thank you for this tutorial keep it up!
Thank you!
Q1: Is the developer account on a separate account from the email you entered for the main PayPal email?
Q2: Do you need to update the token to test a sandbox account?
Q3: Does WooCommerce only set downloadable product orders to complete?
Simon-Thank you. Excellent job. Can I just go in and set up my Sandbox account or is it necessary to set up my regular account first (we are already using PayPal)? Is there a good way to test my sandbox account before I setup and test thru WooCommerce?
Great tutorial, thanks a lot
Glad it was helpful Vlad!
Thanks a lot. V useful. Q1: on my “Orders” page in my dashboard, it says “On hold” instead of “completed. Can I just ignore this, or is there a bug in my system?
Q2: How are orders fulfilled? Manually? I sell digital products and want to have everything automated – after payment, customer gets an email with a receipt and a link to download the product. Any videos on how to set that up in wp/woocommerce?
Q1: on my “Orders” page in my dashboard, it says “On hold” instead of “completed. Can I just ignore this, or is there a bug in my system?
Q1 Answer: When you were checking out using PayPal Sandbox, did you enter in the SAME “sandbox” email and password that you created at https://developer.paypal.com/developer/accounts/? Note, you need to make sure that you enter in a different email when doing test orders.
For example:
PayPal Sandbox (Personal Account): bill@microsoft.com
PayPal Sandbox (Business Account): steve@apple.com
Q2: How are orders fulfilled? Manually? I sell digital products and want to have everything automated – after payment, customer gets an email with a receipt and a link to download the product. Any videos on how to set that up in wp/woocommerce?
Q2 Answer: Orders are filled manually, unless you send them to a fulfillment center. In WooCommerce, after payment, a customer will automatically get an order confirmation email that includes the order details (i.e. receipt).