In this guide, learn how to set up Stripe on your WooCommerce store.
Before we begin you need to ensure you have downloaded the official Stripe plugin from the WooCommerce marketplace.
Ensure this plugin is installed, active, and set up correctly!
If you are more of a visual learner, follow along to my quick and easy video below!
Let’s jump into it!
1. Enable Stripe in WooCommerce
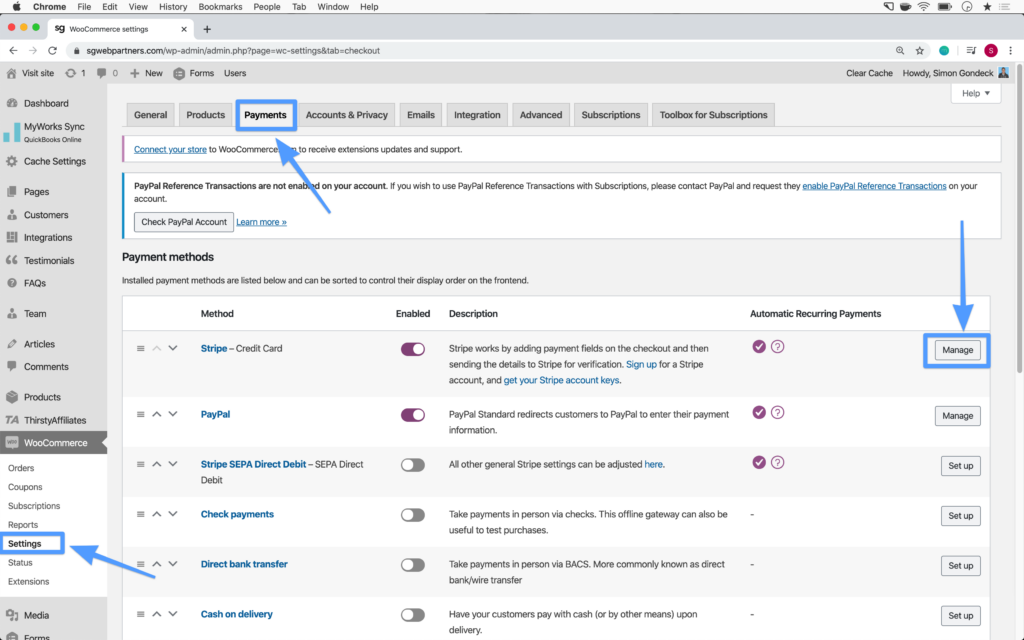
The first step is to go to your WordPress dashboard, hover over WooCommerce, and go to Settings.
Next, click the Payments tab. Enable Stripe and click Manage.
Quick Tip: If you do not see Stripe you need to install the Stripe plugin.

If you have not created a Stripe account yet, create a business account before proceeding.
You need a business account to get your API keys from Stripe.
If you have not created a Stripe account follow along to quick and easy video.
2. Get Stripe API keys
Next, add in your Stripe account keys.
To get your Stripe account keys, you will need to login to your Stripe dashboard.
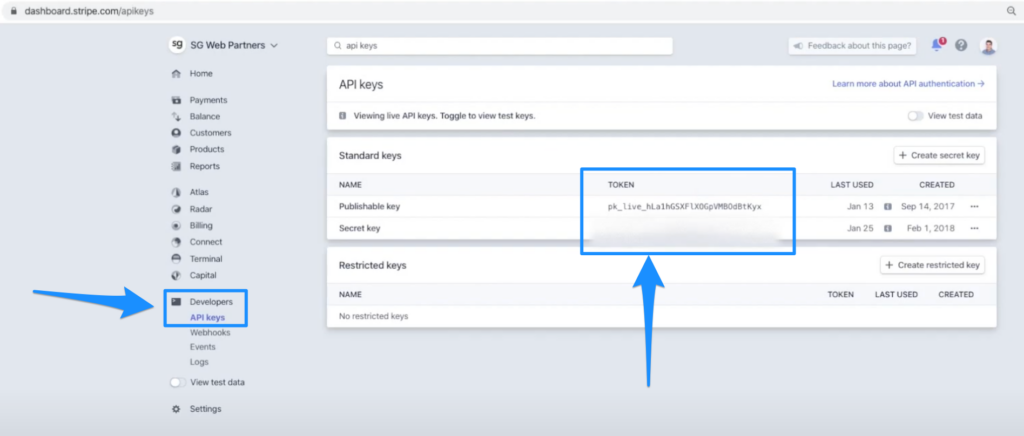
From the Stripe dashboard, click Developers > API keys.

Then, you will be able to view your Publishable key and Secret key. Copy/paste these values in the API credentials section in WooCommerce.

Save Changes.
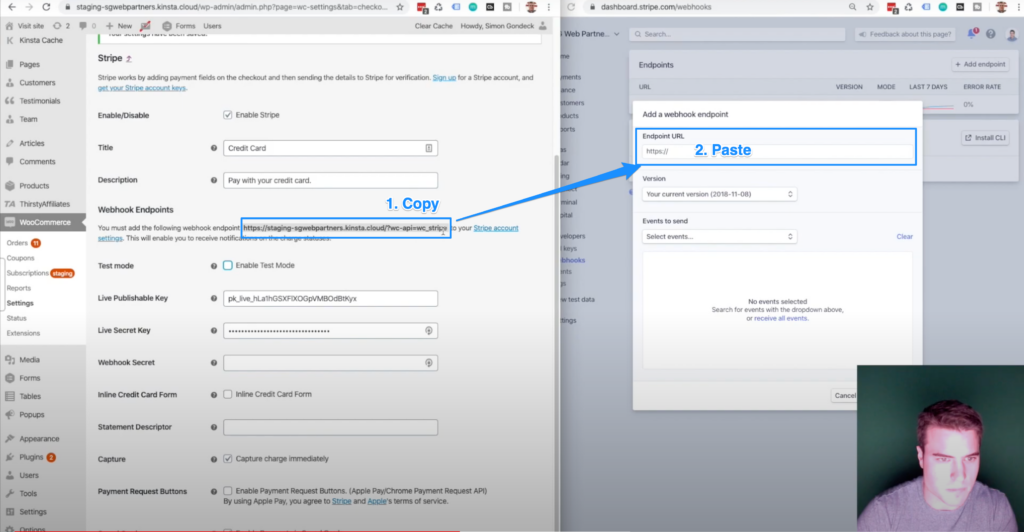
Next, from the Stripe dashboard, click “add endpoint”. Add all of the webhooks outlined in the Stripe docs.
Copy the endpoint url in WooCommerce and paste this value in the endpoint url in Stripe.

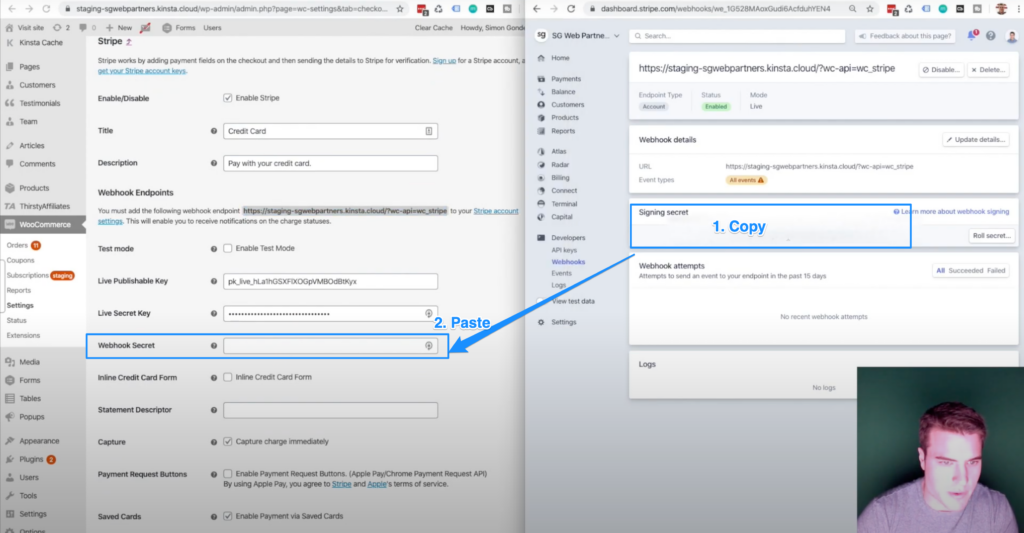
Finally, copy the webhook secret in Stripe and paste this value in WooCommerce.

Don’t forget to click ‘Save Changes’ in WooCommerce.
3. Test that Stripe is working
Finally, do a live transaction on your site using Stripe with your own credit card details. This way we know when real orders come through everything is set up properly!
Pro tip: Update 1 product in your store to be $1 and do a real transaction using Stripe to make sure everything is working!
Open up a browser on your phone or computer and go to your website and add one of your products to Cart.
You should see the option to pay with a credit card. Complete the checkout process and add in your own credit card details.
Afterward, on your WordPress dashboard, go to WooCommerce > Orders and make sure the order is processed successfully.
How to Setup Stripe Test Mode on WooCommerce?
On your WordPress dashboard, hover over WooCommerce and click Settings.
Next, click the Payments tab and click Manage next to Stripe.
Quick Tip: If you do not see Stripe as a payment method, you must install the free Stripe plugin.

Under Webhook Endpoints, find “Test mode” and click Enable Test Mode.
If you scroll down to your Stripe settings page, you will notice we need to insert our Test Publishable Key, Test Secret Key, and Test Webhook Secret.
To get these we need to go to your Stripe Developer account, and Sign In.
On your Stripe Dashboard, search for API keys in the search bar.
Toggle to View Test Data in the top right. Once enabled you will see an orange bar.
Next, copy and paste the new Test Publishable Key and Test Secret Key into your WooCommerce Stripe settings.
Click Save changes.
Your Stripe sandbox account is all set up!

Hi. when I set up my WooCom I let Woo set up my stripe, now I would like to go in to add a product to Stripe (for a trip wire). Because the Stipe account was set up by Woo, I can’t access the dashboard. How do I change this? Is there a plugin for this? Thank you
Hi there,
Work with woocommerce and Stripe.
Have set both API to live mode in woocommerce.
However, I get the following error message in the checkout:
“No such source: ‘src_1JjT1QEA8To0g0LSeiyhy2zT’; a similar object exists in test mode, but a live mode key was used to make this request.”
Where is the mistake?
Check the payment methods in your account. Delete any old payment methods that were used for testing.